I hear ... and I forget
I see ... and I remember
I do ... and I understand
-- Chinese proverb

Physics Education Research shows that students learn best:
- By interacting with their peers, especially when
- The interactions are focused around conceptually-based guided discovery Activities, especially when
- The Activities involve real apparatus and/or simulations.
The Physics Practicals implement the results of this research.
Our largest first-year course has about 1,000 students. Formerly, students had 2 one-hour classes and 1 one-hour tutorial (aka "recitation session") per week. They also had a three-hour laboratory every second week. The Practicals combine the tutorials and laboratories into a single Physics Practical which meets for two hours every week. We have kept our traditional classes.
Students work in teams of four. As enrollments shift and some students drop the course, some re-organisation of the teams is necessary. We never have teams with less than three or greater than four students. In addition, half way through each term we shuffle the teams.
Each team has three designated roles:
- A Facilitator. This person is the primary spokesperson for the team.
- A Skeptic: This person's role is to be skeptical about all conclusions reached by the team.
- A Record Keeper. This person is responsible for keeping the notebook.
We have constructed learning spaces which have an important role in achieving the sort of learning which we believe is most important.
As discussed below, each team of four students work at a Pod. There are nine Pods in each room, and we have twoLearning Assistants (formerly Teaching Assistants) present for each session. We attempt to pair experienced and novice Learning Assistants.
At the University of Toronto we have been using active learning models in our Physics courses for some years. These include Peer Instruction, conceptually based Activities such as various Student Workbooks, etc. Design of the Physics Practicals began in 2005. Construction of our first room occured during the Fall of 2007, and the room was used for a Pilot from January - April 2008 and again from September - December 2008. Construction of two more rooms occured during the Fall of 2008, and in January 2009 we did a full "roll out" and dropped our conventional laboratory and tutorials. In 2015 we "Practicalised" our 150-student first year physics course intended for physics majors and specialists.Two more rooms opened in September 2017.
We have prepared two brochures describing the Physics Practicals, which may be accessed via the blue buttons below. They are both in pdf format and will open in a new tab/window.
A two page overview. (4.6 M)
A nine page discussion of the project (6.9 M)
People
Many people participated in the design and implementation of the Physics Practicals.
The origins of the project was a memorandum by David M. Harrison and Ruxandra M. Serbanescu in 2005.
To the extent that there was a "lead" on this project, it was probably David M. Harrison.
Others who developed the Modules include Jason J.B. Harlow and Kimberly Strong.
Hardware and software was developed by our Physics Undergraduate Technical Services technologists.
Many colleagues in the Department of Physics provided invaluable advice.
Early versions of many materials were tested by undergraduate students Chritos Josephides and Andrew Zasowski. Before the full "roll out" in January 2009 we ran two Pilot Programs staffed by Learning Assistants (aka "Teaching Assistants") Peter Hitchcock, Antony Chen and Catherine Robin.
We were extremely fortunate in having architects from unit a who "bought in" to the project and its vision 
We were supported by the Department of Physics, the Faculty of Arts & Science, the University of Toronto, and the Province of Ontario.
Rooms
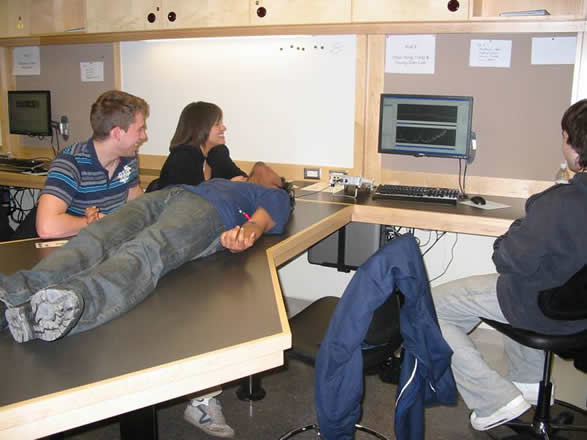
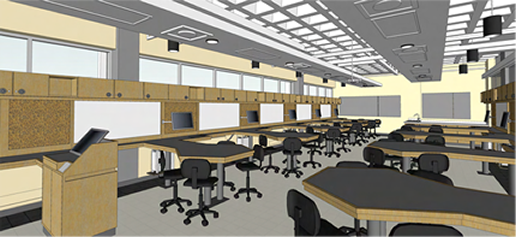
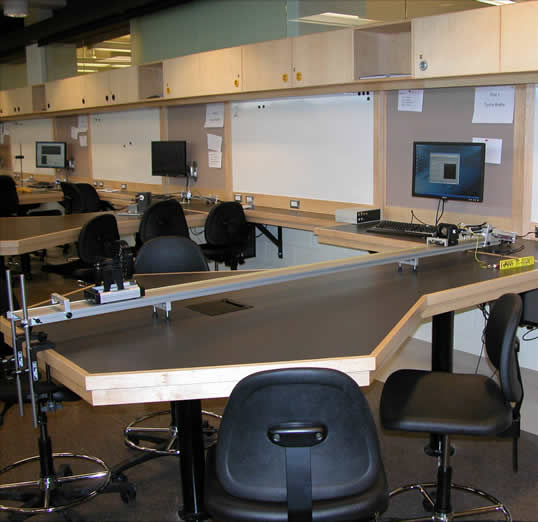 We have designed Pods as a collaborative workspace. Teams of four students work at each pod.
As can be seen, each Pod consists of a hexagonal table with a rectangular section to the wall. Each Pod has:
- AC Power on the walls and in the centre of the hexagonal table.
- A computer (Windows). The monitors are mounted on swing arms.
- U of T Data Acquisition Device.
- A whiteboard. For some rooms the "whiteboard" is tempered glass with a semi-opaque backing: this is to allow natural light into the room.
- A web cam.
The size of the Pod is in part dictated by the 2.2 m Pasco Track (ME-6956) shown in the photograph.
The height of the tabletop is 92 cm. This allows students to work while seated or standing, and is also a good height for the Learning Assistants to lean on while discussing with the students.
Two of our Pods are on hydraulic lifts, so may be lowered for students in wheelcharis.
Among the design constraints is that the Practicals must be neutral in terms of Learning Assistant resources compared to the old laboratory/tutorial structure. This dictated that we have nine Pods in each room. We think that given sufficient resources, eight Pods per room is the ideal number.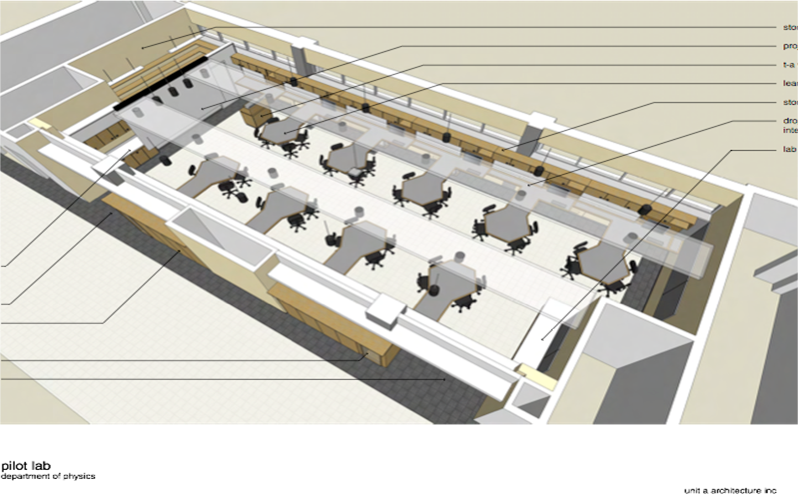
In addition to the Pods, each room has:
- A Learning Assistant station. This is in the upper left corner in the floor plan.
- A projector and screen. The screen is on the left in the floor plan, and may be raised or lowered from the Learning Assistant station.
- A printer station. This is in the lower left corner.
- A double sink in the lower right.
- Motorised blackout curtains.
We worked very closely with our architects to control sound levels. When in operation the room sounds like a busy restaurant: conversations between students at a Pod are easy but there is an underlying buzz.
We also worked very hard on lighting with multiple controls.
About the Importance of Architecture
We have been learning that the design of the Practicals Rooms is vital in achieving the types of learning that we desire. Here is an analogy.
You are hungry, and go into a restaurant. How do you get something to eat?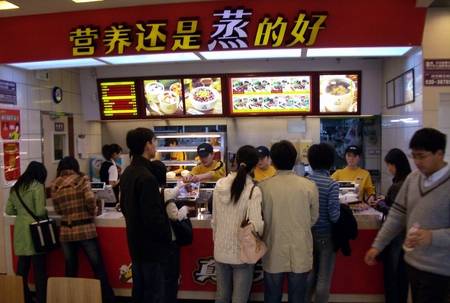
If the restaurant looks like the one to the right the architecture tells you that to get something to eat you:
- Go to the counter and order food.
- Pay for the food.
- They give you food.
- Take the food to a table and eat.
Note that we get this message even it we don't know the language.
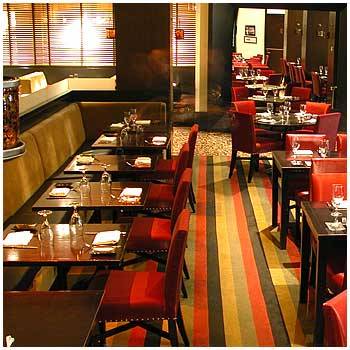
If instead, when you go into the restaurant and see something like shown to the left, the architecture tells you that to get something to eat you:
- Sit down at a table.
- A server will come
- Order food.
- The server will bring the food.
- Eat.
- Pay
You may have experienced going into a restaurant where the architecture sends mixed signals. This is particularly common for ethnic restaurants.
|
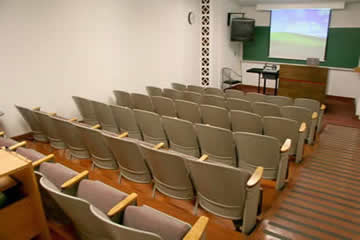
Now imagine that you want to learn. You walk into a room that looks like the one to the right. The architecture tells you to:
Even if the seats can be moved (often they can't) in such a room getting small group discussion to happen is difficult if not impossible: the room has already sent the students the message. |
|
|
|
But if you walk into the room to the left, the message is:
Small group discussion is natural and automatic. |
AV
As already mentioned, there is a projector and screen at the front of the room. The monitor at the Learning Assistant station is a tablet, so that normal handwriting can be used and displayed.
We have a hand-held wireless microphone in each room. These are often used by a Team when they are explaining to their classmates how they solved a problem. This microphone turns out to be useful for many forms of group discussion.
There is also a microphone fixed on the Learning Assistant station.
As mentioned, part of every session usually includes a question and answer session. When students do not bring up questions, we present them with problems to work on.
Here is the hardware and software that has been discussed:
- Learning Assistant monitor/tablet: Sympodium from SMART
- Projector, screen, blind controls: Crestron.
Software
There is off the shelf commercial software for data acquistion, process control, and data analysis. Two of the best known are DataStudio from Pasco and LabQuest from Vernier. However these excellent software products are not a good match to our requirements, largely because many of the details are hidden "under the hood" and not easily accessible to us or our students. Therefore, with some reluctance, we are developing our own software. Our software is based on LabVIEW and SignalExpress; both of these are from National Instruments. In this section we provide access to the software that we have been developing.
At present, each LabVIEW program is "stand alone" and the zip file includes all necessary SubVI's. As we learn more about which SubVI's are required by a substantial number of programs, it is likely that we will begin building common libraries.
The main VI is configured to:
- Begin running when it is invoked.
- Exit LabVIEW when it is stopped.
This makes the VI easy for our students to use, but impossible to edit unless one stops the program with the Abort button instead of the Stop button on the front panel.
All software is Copyright © 2007 - 2009 The University of Toronto Physics Practicals. The software is open source and licensed under a Creative Commons Licence.
- CreateDataset.zip. A LabVIEW program with error checking to create datasets in the standard format.
- ForceSensor.zip . Three LabVIEW programs for use with Pasco Force Sensors CI-6746.
- PolynomialFit.zip. A LabVIEW program for fitting data to polynomials.
- RMS.seproj. A SignalExpress program for use with the Pasco Rotary Motion Sensor CI-6538.
- TestData.zip A collection of datasets for demonstrating and testing the software.
- ViewDataset.zip. A LabVIEW program that views datasets.
Hardware
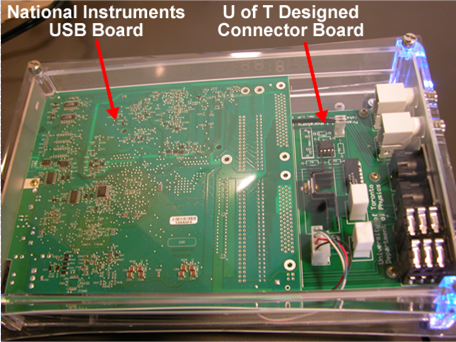
Originally we intended to use commercial data acquisition (DAQ) hardware, such as Science Workshopfrom Pasco. However we found that there were performance issues in using these DAQs with our LabVIEWand SignalExpress software. So, again with some reluctance, we have designed our own DAQ, based on a National Instruments USB -6251 OEM board.
Among the features of our Data Acquistion Device are:
- A clear plastic case with blue indicator lights.
- Digital and analog inputs and outputs.
- USB connection to the computers
- 1.2 M samples/second.
Our device costs about $1200, which is only a bit more than the Science Workshop device from Pasco. It is in principle about 5 times faster than the Pasco device, although in practice because of the issue of drivers for LabVIEW it compares even more favorably to the Science Workshop box.
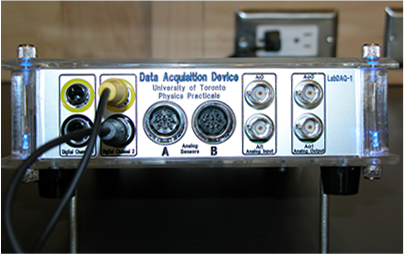
The inputs and outputs are compatible with sensors from a large number of vendors, including force sensors and motion detectors from Pasco.
The principle developer of the U of T Data Acquisition Device was Larry Avramidis of the Department of Physics. The device was a finalist for the Graphical System Design Achievement Award by National Instruments in 2008.