Electricity and Magnetism Module 3
Table of contents
A field is a function, f(x,y,z), that assigns a value to every point in space (or some region of space). Charged particles alter the space around themselves to create an electric field, which, in turn, determines the electric force that will be exerted on a positive test charge placed at each point. The electric field is a vector field, which means that a vector (with magnitude and direction) is assigned to every point in space. For positive test charge q, it is defined as:
\(\displaystyle \vec{E}(x,y,x)=\frac{\vec{F}_{{\rm on}\ q}(x,y,z)}{q} \)
Therefore, the electric field is the electric force per unit charge and is equal to the electric force acted on by a particle with a charge of 1 C.
Electric fields can be represented using electric field lines, which have the following properties:
-
The tangent to a field line at any point is in the direction of the electric field at that point.
-
The field lines are closer together where the electric field strength is larger.
-
Every field line starts on a positive charge and ends on a negative charge.
-
Field lines cannot cross.
The electric potential is defined as:
\(\displaystyle V\equiv \frac{U_{q + {\rm sources}}}{q} \)
where Uq+sources is the electric potential energy. It describes the “ability” of the source charges to interact with any charge q and is present in space whether or not charge q is there to experience it. It is a property of the source charges, and is independent of test charge q.
The electric potential and the electric field are related by the following pair of equations:
\(\displaystyle \Delta V = -\int_{s_i}^{s_f}E_s ds\) \(\displaystyle E_s=-\frac{dV}{ds}\)
where \(\Delta V\) is the potential difference, and s is the position along the line from the initial position si to final position sf. The negative sign indicates that the electric field lines always point in the direction towards decreasing electric potential, so a positive charge loses potential energy and gains kinetic energy as it accelerates along the direction of the electric field lines.
The electric potential can be represented in four ways, using a potential graph, an elevation graph, equipotential surfaces, and contour maps. Equipotential surfaces are frequently used. When moving a charged particle between any two points on an equipotential surface, the following conditions hold:
-
The direction of the electric field at any point is perpendicular to the tangent lines to the equipotential surface.
-
The electric potential energy is constant (\(\Delta U = 0\)).
-
The electric potential is constant (\(\Delta V = \Delta U / q = 0\)).
-
No work is done on moving the charged particle (\(\Delta V = 0\), so \(W = F\ ds = q\ E\ ds = -q\ dV = 0\) ).
It is also worth noting that the tangent lines to equipotentials are perpendicular to electric field vectors.
In this module, we will explore the concept of the electric field and the usefulness of equipotential surfaces.
The Activities
Unless otherwise instructed, answer all questions in your Google slides presentation, including your own sketches where appropriate. For some activities, which will be indicated below, you will need to add sketches to diagrams that are provided at the end of this Student Guide. When completed, these should be copied into your Google slides presentation at the appropriate place.
A ctivity 1
The electric field is an example of a vector field. You can think of a vector field as a region of space filled with an infinite number of arrows, with each arrow’s length proportional to the value of the vector quantity at that point in space, and the direction of the arrow showing the direction of the vector.
A wind-velocity field is an example of a vector field. Such a field can be represented in several ways. One way to describe the wind-velocity field is to assign to each of the infinite number of points in space a pair of numbers: a wind speed, and a wind direction. Another way to describe the wind-velocity field is the graphical method: drawing an arrow whose length is scaled to give the speed of the wind, and whose direction points in the direction of the wind. Naturally, with the graphical method, one would just draw a representative number of arrows, not one for each one of the infinite points in space.
The two figures below show two different representations (weather maps) used by meteorologists to indicate wind speed and direction across an area (taken from https://www.wunderground.com/maps/wind/current-winds/roc and http://squall.sfsu.edu/). The first figure uses the lines and arrows to represent wind direction and colour to represent wind speed (the speed map is an example of a scalar field). Note: The knot is a unit of speed sometimes used in meteorology, which has its origins in navigation, as the speed of a ship used to be measured with the help of a knotted rope. 1 knot = 1 nautical mile per hour = 1.151 statute mile per hour (mph) = 1.852 km per hour.
- How are direction and magnitude indicated on these two maps?
- In what ways is the first map better? In what ways is the second map better?
- Can you think of any other examples of vector fields?

Activity 2
-
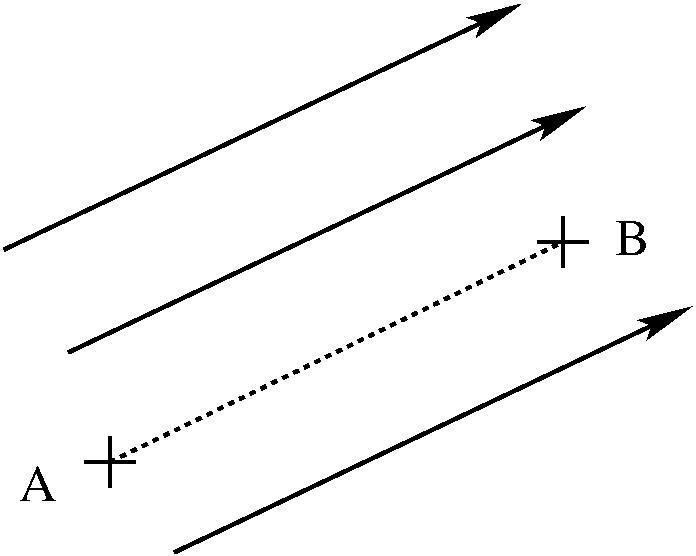
The electric field of a point charge (not shown) is given below at one point in space. Can you determine whether the charge is positive or negative? Explain why or why not.

-
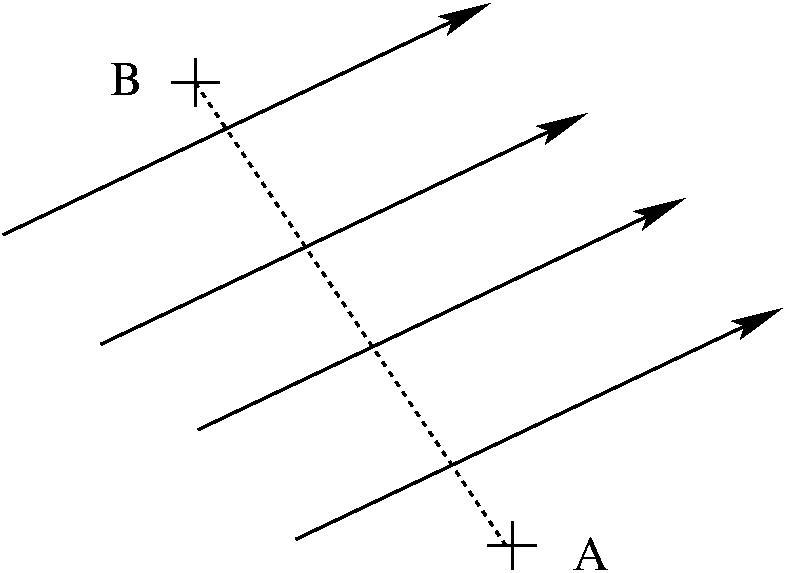
In the figure below, the electric field of a point charge is shown at two positions in space. Now can you determine whether the charge is positive or negative? Explain why or why not.

-
Can you determine the exact location of the charge? If so, draw it on the figure shown in Part B. If not, explain why not.
Activity 3
Choose two of the four figures below (either a and c OR b and d). At each of the dots, use a black pen or pencil to draw and label the electric fields  and
and  due to the two point charges. Sketch these figures and draw the electric fields in your lab notebook. Make sure that the relative lengths of your vectors indicate the strength of each electric field. Then use a red pen or pencil to draw and label the net electric field
  at each dot. Be sure to indicate which two figures you have chosen.

Activity 4
The graphs below of electric potential versus position are for regions in which there may be electric fields. On each of these graphs, draw a second line that is consistent with each of the following modifications.
-
The direction of the electric field in Region A is reversed, while its magnitude is unchanged and the potential at x = 0 cm remains the same.
-
The electric field in Region B remains the same, but the potential at x = 2 cm increases to 10 Volts.
-
The electric field in Region C remains the same, but the potential is cut in half at x = 2 cm.
-
The magnitude of the electric field in Region D is increased keeping the same direction, and the potential at x = 2 cm remains the same.
-
The direction of the electric field in Region E is reversed and its magnitude increases, but the potential at x = 4 cm remains the same.
-
The electric field in Region F remains the same, but the potential at x = 2 cm is 20 Volts.
Note: An additional copy of these graphs is provided at the end of this Student Guide. Draw your lines on that pull-out copy and attach it to your lab notebook at the appropriate place.

Activity 5

Two very large, parallel insulating sheets have the charge densities, , shown in the figure to the right. (Only a small portion near the centre of the sheets is shown.)
For each change listed in the table below, state whether the magnitude of the electric field at point P just to the left of the left sheet increases, decreases, or remains the same. Provide your answers in your lab notebook, and include a brief justification for each. You may find it useful to tabulate your answers in the format shown.
|
Change |
Increases |
Decreases |
Same |
|
1. Sheet B is moved to the left. |
|
|
|
|
2. Sheet A is moved to the right. |
|
|
|
|
3. Sheets A and B exchange positions. |
|
|
|
|
4. The area of both sheets is doubled while charge density η remains constant. |
|
|
|
|
5. The area of both sheets is doubled while the total charge on each remains constant (η changes). |
|
|
|
|
6. The charge density of sheet A is changed to -3µC/m2. |
|
|
|
|
7. The charge density of sheet B is changed to -5µC/m2. |
|
|
|
|
8. The sign of the charge on sheet B is changed. |
|
|
|
|
9. A positive point charge is placed at Point R. |
|
|
|
|
10. Point P is moved a small distance to the left. |
|
|
|
Now, for each change listed in the table below, state whether the magnitude of the electric field at point R midway between the two sheets increases, decreases, or remains the same. Note that when one of the sheets is removed, point R remains fixed at its original location.
|
Change |
Increases |
Decreases |
Same |
|
11. Sheet B is moved to the left, but is still to the right of point R. |
|
|
|
|
12. Sheet A is moved to the right, but is still to the left of point R. |
|
|
|
|
13. Sheets A and B exchange positions. |
|
|
|
|
14. The area of both sheets is doubled while the total charge on each remains constant. |
|
|
|
|
15. The charge density of sheet A is changed to -3µC/m2. |
|
|
|
|
16. The charge density of sheet B is changed to -12µC/m2. |
|
|
|
|
17. The sign of the charge on sheet B is changed. |
|
|
|
|
18. A positive point charge is placed at Point P. |
|
|
|
|
19. Point R is moved closer to sheet A. |
|
|
|
Activity 6
The graph in the figure below shows the electric force in the x-direction acting on a proton at different times. Four students are discussing inferences that might be drawn from this graph:
Student 1: “The electric fields at C and E are zero because the slope of the line is zero.”
Student 2: “No, the electric potentials at C and E are zero because the slope of the line is zero.”
Student 3: “I think the electric field is zero at F because the electric force is zero.”
Student 4: “No, you are all wrong. Force and electric field vary as 1/r2, so we should be looking at curved lines, not straight lines.”
Which, if any, of these students is correct? Explain your answer.

Activity 7
You have been assigned the task of determining the magnitude and direction of the electric field at a point in space. Devise an experiment to determine the electric field. (Note: you will not actually perform this experiment.) List any objects that you will use, any measurements that you will make, and any calculations that you will need to perform. Describe briefly how you would analyze the results of your experiment. Make sure that your measurements do not disturb the charges that are creating the field.
Activity 8
The dashed lines in the figure below show equipotentials in a region in which there is an electric field. A positive point charge is placed at each of the seven labelled points in turn. On the diagram, draw vectors to show the direction of the force on the charge at each of the labelled points. Briefly explain your reasoning.
Note: An additional copy of this figure is provided at the end of this Student Guide. Draw your vectors on that pull-out copy and attach it to your lab notebook at the appropriate place.

A ctivity 9 - Electric Field Mapping
In this experiment, charges will be placed on conducting surfaces and the electric field set up by these charges will be mapped. In Module 2 you used a battery as a source of voltage. Here you will be using a DC power supply, which has exactly the same functionality.
PART A
Work Done When a Charge Is Moved In an Electric Field
|
Recall that work = force × displacement, where "force" is the component of the force in the direction of the displacement. Suppose a positive charge q = 5 x 10⁻⁶ C is placed at point A in Figure 1. The electric field strength E is assumed to be constant, E = 7 N/C, in the direction indicated by the arrows. The unseen charges which set up the electric field are responsible for the push on the charge q, and the net force on the charge is F = qE = 35 x 10-6 N. Assuming the distance through which the charge q moves from A to B is d = 2 m, the work done by the electric field is W = Fd = 70 x 10-6 Joules.
|
|
|
The situation is quite different in Figure 2. There, the path along which the charge moves is perpendicular to the electric field. This means that the force exerted on q by the charges which set up the electric field is perpendicular to the displacement of the charge, so the component of the electric force along the direction of the displacement is zero. |
|
Thus, the electric field does no work on the charge q as it moves from point A to point B. Since no force resists the motion along the path, we are free to imagine that virtually any small force whatever could have moved the charge q along this path; the cause of this force is irrelevant. The point here is that the electric field does no work on any charge moved along a path that is everywhere perpendicular to the electric field.
Along which paths A, B, C, and D, shown in the figure below, is work done by the electric field (indicated by the arrows) on a positive charge moved along the path, and along which paths is zero work done? Explain your reasoning.

Using a Multimeter to Find Paths of Zero Work:
A multimeter in the DC-V (direct current, voltage) mode can be used to map paths of zero work in an electric field. It's done this way: the negative lead from the black jack is connected to some object whose charge state is constant; this is often the earth ("ground"), which is so large that its surface charge may be regarded as constant. Other objects can be treated as if they were ground, and with the negative lead connected to them.
The lead from the red jack (the positive jack) of the multimeter is then used as a probe to pick a point--any point--and measure its voltage; then the probe is moved over the region to find points in space which provide the same voltage reading. Paths made up of points which are at the same voltage are paths along which zero work would be done if any charge is moved along this path.
PART B
Voltage is sometimes referred to as "potential", so the lines or curves of equal voltage are called "equipotential paths", or "equipotential curves", or "equipotential lines". If one can map the equipotential curves of an electric field, one then has only to draw perpendicular curves or lines which intersect the equipotential curves at right angles in order to specify the electric field.
How is the Direction of Electric Fields Determined?
The direction of the electric field lines may be shown by arrows on the field lines; they point toward regions of lower potential, or voltage.
Note: Additional copies of the figures in Parts B and C are provided at the end of this Student Guide. Draw your vectors on that pull-out copy and attach it to your lab notebook at the appropriate place.
Sketch several representative lines representing the electric field pattern for the three equipotential patterns shown below. Draw arrows on the lines to show the direction of the electric field.

PART C
Sketch the equipotential patterns corresponding to each of the electric field patterns shown below. Label three of the equipotential curves in each diagram "20 V", "10 V", and "5 V"; these are completely arbitrary. Remember, the electric field lines point toward regions of lower potential.

PART D
You are going to map the electric field patterns set up by pairs of objects that are oppositely charged. One object will be negatively charged, and will be referred to as "ground"; the other object will be positively charged. The pairs of objects are: (i) parallel lines, and (ii) a pair of points. You will be provided with two sheets of black conductive paper that are capable of carrying small current and have painted with conducting silver paint. Since the charged paths will actually be conductive ink electrodes, they will be referred to as electrodes. Diagrams of these traces are included in this handout.
-
Choose one of the sheets and place it on your corkboard.
NOTE: The traces for parallel lines have a large silver pad at the midpoint of each line. Use these pads as electrical contacts for the parallel electrodes.
-
Select the red wire with a banana plug on one end, and a ring terminal on the other. Insert the banana plug into the red (positive) jack of the power supply, and place the ring terminal on top of one of the silver pads on the conductive paper. Ensure the flat side of the ring terminal is the side touching the paper, and press a conductive push pin through the ring terminal into the corkboard. Make sure that good metal-to-metal contact is made between the ring terminal and the silver pad.
-
Select the black wire with banana plug and ring terminal, this time connecting the black (negative) power supply jack to the other electrode with another push pin.
-
On the diagram in this handout (not on the black paper), label the corresponding electrode "25 V", and the other one "0 V"; it doesn't matter which one is positive, and which is negative.
-
Select the wires (one red, one black) with a banana plug on one end and a pointed metal rod on the other. These are the probes for the multimeter. Connect the red banana plug to the V-ohm jack and the black banana plug to the COM (common) jack on the multimeter.
-
Switch on your multimeter and select DC-V to enable measurements of voltage (potential). If the display shows "batt", replace the battery of the multimeter.
-
Plug in the power supply, turn it on, and set its voltage to about 25 Volts. You can check the voltage using the multimeter. To prevent the highest voltages to be out of range for your multimeter, use the 40 V maximum setting.
-
The power supply acts just as a DC battery would, so the objects on the corkboard are now charged and have an electric field in the region between them.
-
When measuring potential of a point on the conductive sheet using the multimeter, bring and hold the black probe in contact with the push pin connected to the negative (-) jack of the power supply, bring the red probe in contact with the point of interest, and observe the reading on the multimeter.
When the circuit is complete, it should look something like the photo below.
When the circuit is complete, it should look like the one below.

-
Gently scrape the banana plug over the paper between the two objects until you find a point at which the potential (voltage) is about 5 Volts; don't make any pencil or pen marks on the black paper. Next, find the path from this point along which the potential stays constant at 5 Volts; follow this path wherever it leads, even if the path curves around behind the edges of the objects. This path traces a curve or line called the "5-Volt equipotential line". You may find it easier to plot a series of points rather than tracing a continuous line. For example, you could work across each row of the grid to find the location of the 5-Volt potential, mark these points, and then connect them to obtain the 5-Volt equipotential line.
-
After you have located the 5-Volt equipotential line, sketch its approximate shape and location on the diagram below; it is not necessary to be exact. Label this line "5 V".
-
Repeat Steps 9 and 10 to find the 10-V, 15-F and 20-V equipotential lines.
Keep in mind, as you plot the equipotential lines, that the electric field is strongest in those regions where the equipotential lines are most closely spaced. This is because the electric field E is related to the gradient of the potential field: E = - ΔV/Δr, where ΔV is the change in the potential which occurs over a change in location Δr.
-
The electric field pattern consists of lines or curves which cross the equipotential curves at right angles. Sketch a representative number (15-20) of these electric field lines, and place arrows on a few of them to indicate the direction along which a positive test charge would move if one were placed at that point. Make sure that an electric field curve passes through each of the six small circular points shown on each pattern.
- In each of the patterns shown, there are tiny circles through which one of the many electric field curves pass. Using the procedure described below, calculate the electric field strength at each one of these points.
Magnitude of electric field strength = |ΔV/Δx|.
(It's |dV/dx|, for those who know calculus.)
This calculation is illustrated in the figure below for Point Q. Locate two points 0.5-cm on either side of Point Q along the electric field line passing through it. Estimate the potential at Points P and R, and subtract the smaller from the larger to get ΔV.

Note: the distances on your plots on the next pages probably won't be the same as on the actual configuration. This doesn't matter; what's important is to record the relative values of the electric field strengths; these will be the same irrespective of scale. What you do need to keep track of are the uncertainty values associated with your measurements and the resultant error analysis.
Divide this potential difference by Δx, in centimeters (no need to convert to meters). Label each of the six points in each pattern with these numbers, including error.
Please repeat all steps with both patterns.
PART E
The more closely spaced the electric field lines are in any region, the more intense is the electric field. We also know that electric fields have equipotential lines, and how far equipotential lines are spaced also indicates the strength of the electric field (ex. the distance between the 10V and 15V equipotentials and the 5V and 10V equipotentials in the two cases we've explored). Looking at your field and equipotential plots from both diagrams (the points AND the lines), can you make a generalized statement about how the electric field strength near a conductor depends on the shape of the conductor?
This Guide was written in October-November 2007 by Kimberly Strong, Dept. of Physics, Univ. of Toronto.
Activity 1 is based on ILD 10, Representation as Communication: Fields, University of Maryland Physics Education Research Group (Spring 2003) and The Electric Field Mapping experiment, by Joseph Alward and Jason Harlow, Introductory Laboratories, Physics Department, University of the Pacific (2004). Activities 2, 3, and 4 are taken from Randall D. Knight, Student Workbook (Pearson, 2004). Activities 5, 6, 7, and 8 are taken from Curtis J. Hieggelke et al., E&M Tipers: Electricity and Magnetism Tasks (Pearson Prentice Hall, 2006). Activity 9 is based on The Electric Field Mapping experiment, by Joseph Alward and Jason Harlow, Introductory Laboratories, Physics Department, University of the Pacific (2004).


Diagram for Activity 4

Diagram for Activity 8

Diagrams for Activity 9, Parts B and C
PHY131 Practicals Manual Electricity and Magnetism Module 3