Electricity and Magnetism Module 6
Table of contents
NOTE: for most setups the North poles of the magnets are colored red.
 Activity 1
-
You are supplied two bar magnets, with the North and South poles marked. Do the same poles attract or repel each other? Do the opposite poles attract or repel each other?
-
I
 magine that you have two electric dipoles, each of which consists of equal and opposite electric charges +q and –q separated by a constant distance d. Would the positive “poles” (i.e. charges) of the dipole attract or repel each other? What about the opposite “poles”? Is there any difference between the interaction of two electric dipoles and two bar magnets?
 Activity 2
I n Electricity and Magnetism Module 1 you may have used a white pith ball, which is an insulator, and a black Aluminum coated pith ball, which is a conductor, both hanging by strings from stands. In this Activity you are given those two balls again plus a small carbon steel ball hanging by a string from a stand. The steel is also a conductor. In this Activity you will use one of the two supplied bar magnets.
-
Does the North Pole of the magnet exert a force on the white pith ball? How about the South Pole of the magnet? Repeat for the Aluminum coated pith ball.
-
Does the North Pole of the magnet exert a force on the carbon steel ball? If so, is the force attractive or repulsive?
-
Predict whether or not the South Pole of the magnet will exert a force on the carbon steel ball. Will it be attractive or repulsive?
-
Check your prediction. Were you correct? Explain.
-
Does the magnet interact with other insulators and conductors in the room? What about the whiteboard? Generalize your observations about the interaction of the magnet with insulators and conductors.
Activity 3
In addition to the bar magnet of Activity 2, you are supplied an unmagnetised soft iron rod. Imagine that you don’t know which object is the magnet. Using only the bar magnet and the iron rod, find a way to determine which object is the magnet.
Activity 4
In Electricity and Magnetism Module 1 Activity 1 you may have put an electric charge on a length of sticky tape by suddenly peeling it off the tabletop and hanging it from the cupboard. You may wish to refer to the Student Guide for that Module and/or your lab book to refresh your memory. Repeat that procedure.
-
Does the magnet exert a force on the charged tape? Is there a difference between the North and South poles?
-
You are supplied with an aluminum rod, which is not magnetizeable. Does it exert any forces on the charged tape? Are there any differences between the interaction of the tape with magnet and with the aluminum rod?
-
What can you conclude about the interaction of stationary electric charges with magnetic fields?
Activity 5
We can describe the fact that the Earth exerts a gravitational force on all objects near it by saying:
-
The Earth creates a gravitational field in all regions of space around it.
-
The gravitational field exerts a gravitational force on all objects in the field.
A convenient definition of the gravitational field is that it is equal in magnitude and direction to the acceleration due to gravity \(g\) at that point in space. Then the gravitational force exerted on a mass m in the gravitational field is:

\(F=mg\)
We could measure the direction of the gravitational field by taking a mass hanging from a string and observing in what direction the mass hangs. The figure to the right illustrates.
A compass is a little bar magnet that is free to rotate. In this Activity we will use a simple compass to measure the direction of the magnetic field around various objects. The procedure is similar to the one we described for determining the gravitational field. We will use the following standard convention:
The direction of an external magnetic field is indicated by the arrow on the compass.
All of the fields you will map are sufficiently strong that the Earth’s magnetic field is negligible.
Be sure when you are mapping a magnetic field that all other magnets and metals are as far away as possible.
-
Map the magnetic field around one of the bar magnets using the compasses. Use your results to sketch the magnetic field “lines” around the bar magnet. Be sure to include arrows on the lines to indicate the direction of the magnetic field.
-
P
 lace the two bar magnets together, with the North pole of one in contact with the South pole of the other, as shown. Map the magnetic field of the combination and sketch the field lines including the direction of the field. Are the field lines of the combined magnets different from that of a single bar magnet?
 -
You should be provided with the Outer coil of a PASCO Scientific SE-8653 double-coil set.
 You are supplied with a plastic plate with a rectangular hole cut in it. Place the outer coil in the hole. Place the compasses on the Plexiglas and connect the 6V battery to the red sockets on the outer coil, with a switch to avoid draining the batter.
This type of switch is called a Contact Key which is only on when you hold it down.
The symbol for a coil is shown to the right.
 So the circuit diagram of the your experiment is the following:
Use the compasses to map the magnetic field around the coil, and draw field lines including the direction. Compare your results to Parts A and B.

-
In terms of its magnetic field we can model the Earth as having a big bar magnet inside it. Is the N-side of this imaginary interior bar magnet located near the geographic North pole (where Santa’s workshop is located) or the geographic South pole (where the penguins live)?
Activity 6
In this activity, you will investigate the magnetic field generated by a straight current carrying wire.
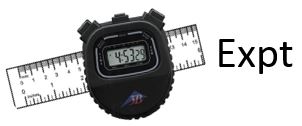
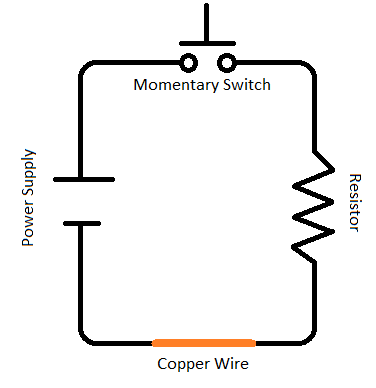
The setup in front of you is comprised of a 13.8V 15A power supply, momentary switch (the big red button), resistor, vertical copper wire, rotary position sensor and a Hall Effect Sesnor, similar to what is shown in the picture to the right. (Be sure to refer to the appendix at the bottom of this page for more information on sensor, which is similar to the GMR). The electrical circuit for this setup in shown to the left.
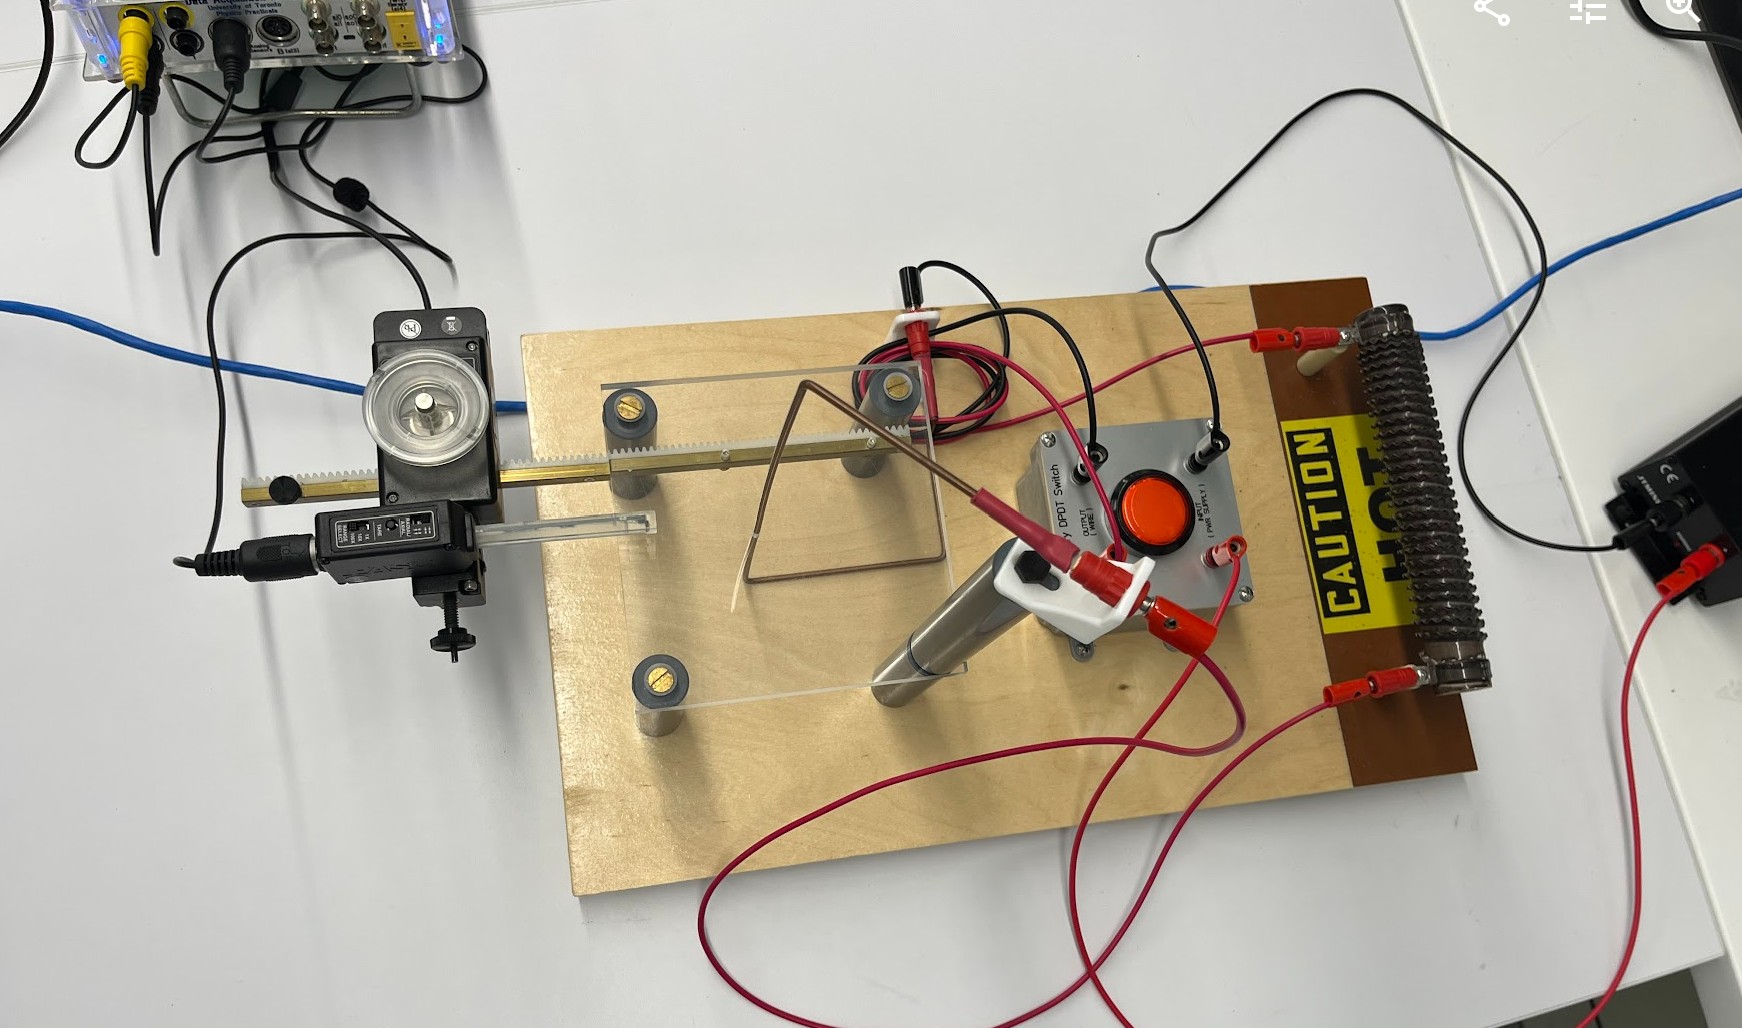
** Please make sure the power supply is OFF before touching the circuit**
Check to make sure the system is wired correctly.
Stand clear of the power supply, as well as the giant resistor. As the sign indicates, the resistor tends to heat up upon continuous use.
Turn on the power supply by toggling the switch at the back from “O” to “I”. To allow current pass through the copper wire, press and hold down the momentary switch (big red button).
- Place the provided compasses on the Plexiglas around the copper wire and press the red button. What do you notice? Sketch the magnetic field lines around the wire.
- We now use the Hall Effect Sensor and the position sensor to measure the magnitude of the magnetic field around the wire. First, log into your computer and open “Capstone Shortcut” folder on the desktop. Open the PASCO Capstone app called “Magnetic Field”. If you see any data be sure to Delete Last Run. Move the sensor away from the wire and press “Tare”. Make sure the Hall Effect Sensor is set to “Radial” and “100X” range. To measure the magnitude of the magnetic field, press and hold the red button on the circuit, click "Record" in the Capstone app to begin data collection, and slowly move the sensor towards the wire until it almost touches it, then click "Stop" to end the data collection. If you are not satisfied with your measurement, click on “Delete Last Run” and repeat the process. How do you expect the magnetic field to vary with distance from the wire? What equation describes the magnetic field at a distance from a current carrying wire? Check your answer by first highlighting what you consider to be good data by clicking the "Highlight range" icon
 and drawing a box around the good data. Then click the "Curve fit" icon
  and select the appropriate function you wish to fit. In your logbook, be sure to explain what fit parameters correspond to what physical quantities, and what you expect for these parameters. Print the graph, staple it into your notebook, and also record the values of fit parameters in your lab notebook.
 - Use a clamp meter to find the current through the wire. Using the retrieved fit parameters from part B and your current measurement, find the resulting permeability of free space (\(\mu_0\)). How does your finding compare with the accepted value of \(\mu_0\)? Explain any discrepancies.
Activity 7
In Activity 5 you mapped the magnetic field of a coil carrying an electric current. In Activity 6 you explored the magnetic field of a single straight current carrying wire. In this activity, you are asked to apply what you have learned to conceptualize the characteristics of the magnetic field resulting from current flowing through a coil of wire (called a solenoid) similar to those used in Activity 5.

On the right is a diagram of the cross section (cut lengthwise) of a solenoid.
Due to the difficulty of representing a three dimensional object in a two dimensional image, a special convention is used to represent the direction of current that flows into or out of the screen.
 represents a wire with current flowing out of the screen.
 represents a wire with current flowing into the screen.
One could imagine current flowing out of the screen from B1, then into the screen at B3, then the current flows to A1, then A3, and so on, all the way to B4.
You are asked to characterize the magnetic fields resulting from the current at these points.
-
Sketch the total magnetic field at point \(\alpha\) due to currents A1 and A2, as well as the components due to each, indicating the magnitudes by the lengths of the vector lines. You do not need to do a detailed calculations of the magnitude of the fields, just a rough estimate. On the same sketch, add the total magnetic field (and the individual components) at point \(\alpha\) due to currents A3 and A4. Be sure to clearly label each vector. What is the direction and magnitude of the total magnetic field at \(\alpha\) due all four A currents?
-
Repeat Part A for the B currents. How do these magnetic fields compare to those in Part A?
-
Repeat Parts A and B for the point \(\beta\), which is on the axis of the coil.
-
Repeat Parts A and B for the point \(\gamma\). Compare to your result from Part C.
Activity 8
-
In Part B of Activity 5 you made a big bar magnet by joining two smaller magnets together and determined its magnetic field. In Electricity and Magnetism Module 3 Activity 9 you may have determined the electric field of an electric dipole, which is comprised of two equal and opposite charges separated by some distance (the figure for Activity 1 of this module shows two such dipoles). Are there any differences between the shape of the magnetic field of a big bar magnet and the shape of the electric field of an electric dipole?
-
If you have an electric dipole and cut it in half along its axis you end up with an isolated positive charge and an isolated electric charge. If you take the big bar magnet of Part B Activity 4 and take it apart into two smaller magnets, do you end up with an isolated magnetic North “charge” and an isolated magnetic South “charge”? What about if you took one of the small bar magnets and sawed it in half [don’t actually do this!]? Can you think of any reason why we never observe an isolated magnetic “monopole”?
Activity 9
The force exerted on a moving charge inside a magnetic field is given by:
\(\vec{F} = q\vec{v} \times \vec{B}\) (1)
-
The direction of this force is always perpendicular to the velocity of the charge. Can this force ever do work on the charge?
-
Here is a figure of a typical electric motor:

A current in the loop experiences the forces shown due to the magnet. Eqn. 1 describes the forces. Is this fact consistent with your answer to Part A? Do motors do work? Explain.
Activity 10

A galvanometer is a type of ammeter. Typically, galvanometers consist a coil of wire embedded within a set of permanent magnets. A spring is used to apply a torque on the suspended coil to set the meter to its initial zero value when no current is present. As we introduce a DC current, the magnetic field exerts an opposing torque on the coil which shifts the pointer of the galvanometer away from zero, indicating the presence of DC current.
Many galvanometers are capable of detecting very small currents, but often are not as accurate as more modern instruments. Some galvanometers do not even attempt quantitative measurements of the value of the current but are just used to detect their presence and direction.
Although sometimes a galvanometer is represented in circuit diagrams as an ammeter, it is usually drawn as shown to the right.
In 1831 Faraday asked an interesting question. His reasoning was:
Electric currents cause magnetic fields. Is the converse true: do magnetic fields cause electric currents? Are there exceptions?
A diagram of the apparatus he used to try to answer this question is shown to the right. A battery is connected to a coil of wire, which will generate a magnetic field when the switch is closed. A second coil of wire is connected to a galvanometer. If the magnetic field from the first coil causes electric currents in the second coil, then the galvanometer could show a current provided it is sensitive enough. In the actual experiment, the two coils of wire were concentric with each other.
A photograph of the coils you will be using appears as part of Activity 5 above.. In the photograph the inner coil is slid partly out from the outer one. In this experiment the inner coil should be slid all the way into the outer coil. The battery and switch should be connected to the outer coil using the red banana sockets, and the galvanometer should be connected to the inner coil using the black banana sockets.
In Activity 3 you may have used an unmagnetised soft iron rod. This rod comes with the coils, but is not part of the apparatus for this Activity. Please be sure to set it aside and do not use it here.
The switch you will use is called a Contact Key: this type of switch is only on when held down. Please do not leave the switch closed for too long: this will drain the battery.
Also please do not connect the battery to the inner coil: the resistance of that wire is so small it will either quickly drain the battery or trip the circuit breaker on the battery.
What is the answer to Faraday’s original question? Is there anything else going on or is this just a failed experiment?
Activity 11
You are supplied a soft iron cylinder, which you may have used in Activity 3. Insert the rod completely into the hole in the inner coil of the setup you used in Activity 10.
A. What do you expect to happen if you repeat the experiement from Activity 10 with the iron rod in the coil?
B. Repeat the experiment from Activity 10 with the iron rod in the coil. What happened? Is the result different from what you observed in Activity 10? Why or why not?
C. Now disconnect your circuit. Wire the outer coil to the galvanometer (ie. without the switch or the battery). You are also supplied with a bar magnet. What do you expect to happen if the bar magnet passes through the outer coil? Pass the bar magnet through the outer coil by pushing it through with your finger - don't drop the bar magnet! What happens? Is the result different from what you observed in Activity 10 or Part B? Why or why not?
Activity 12

A U-shaped conducting wire is placed inside a magnetic field \(B\) that points into the page, as shown in the figure to the right. Another straight wire is placed over the U-shaped wire and pulled to the right at a constant velocity \(v\). At some moment in time the contact between the U-shaped and the vertical wires is at points a and b.
-
what is the magnitude and direction of the force exerted on the electrons in the vertical wire by the magnetic field?
-
If an electric field in the vertical wire were to exert the same force on the electrons as the answer to Part A, what would be its magnitude and direction?
-
If the electric field of Part B is constant, what is the potential difference ΔV between points a and b?
-
The magnetic flux \(\Phi_B\) through the loop consisting of the U-shaped wire and the vertical wire is the magnitude of the magnetic field \(B\) times the area \(A\) of the loop. What is the rate of change of the magnetic flux?
-
Compare your answers to Parts C and D. Explain.
Activity 13
Lenz’s Law is often stated: “The direction of an induced current is such that the induced magnetic field opposes the change in the flux.” However, an alternative statement is: “The direction of induced current opposes its cause.” You may find that the second form is useful for this Activity.

-
A bar magnet is falling towards a circular loop of wire as shown. The falling magnet induces a current in the wire. The current in the wire exerts a force on the falling magnet. What is the direction of the force exerted on the magnet?
-
T
 he magnet has fallen past the loop of wire and is now accelerating away from it. Now what is the direction of the force exerted on the magnet?
-
T
 he magnet is falling away from the loop as in Part B, but the poles of the magnet are reversed. What is the direction of the force exerted on the magnet?
-
If your answers to Parts A, B, and C were opposite to the correct answers, would this violate any physical principles?
Appendix
Here we discuss Giant Magnetoresistance (GMR) and how the effect is used to measure a magnetic field. GMR was discovered independently in 1988 by Grünberg and Fert; they were awarded the Nobel Prize in Physics in 2007 for their discovery. It is now used extensively in read heads of computer disc drives.
GMR is a quantum mechanical effect that produces significant decreases of resistance in the presence of an external magnetic field. GMR materials are commonly comprised of alternating very thin layers of various metallic elements. As described by IBM:
The key structure in GMR materials is a spacer layer of a non-magnetic metal between two magnetic metals. Magnetic materials tend to align themselves in the same direction. So if the spacer layer is thin enough, changing the orientation of one of the magnetic layers can cause the next one to align itself in the same direction. Increase the spacer layer thickness and you'd expect the strength of such "coupling" of the magnetic layers to decrease. But as [an IBM research team] made and tested some 30,000 different multilayer combinations of different elements and layer dimensions, they demonstrated the generality of GMR for all transition metal elements and invented the structures that still hold the world records for GMR at low temperature, room temperature and useful fields. In addition, they discovered oscillations in the coupling strength: the magnetic alignment of the magnetic layers periodically swung back and forth from being aligned in the same magnetic direction (parallel alignment) to being aligned in opposite magnetic directions (anti-parallel alignment). The overall resistance is relatively low when the layers were in parallel alignment and relatively high when in anti-parallel alignment.
A GMR sensor that measures magnetic fields uses four such resistors in an arrangement called a Wheatstone bridge. The two resistors R are shielded from the magnetic field, and the two resistors r are exposed to it. The sensor is driven with an applied voltage \(\Delta{V}\), which is 5 volts in our case. Then we measure the voltage V. It is fairly easy to show that:

Further information on GMR sensors is at: http://www.nve.com/Downloads/lowfield.pdf.
This Guide Sheet was written by David M. Harrison, Dept. of Physics, Univ. of Toronto in January 2008. Activity 4 is from Lillian McDermott et al, Tutorial in Introductory Physics, Magnets and Magnetic Fields I.B, (Prentice-Hall, 2002), pg. 113. Parts of Activity 5 are similar to Priscilla W. Laws et al., Workshop Activity Guide, Module 4, Unit 28, (John Wiley, 2004), pg. 725.
The figure of the electric motor is slightly modified from Fig. 32.48 of Randall D. Knight, Physics for Scientists and Engineers (Pearson, 2004). The figure of the mechanism of a galvanometer is slightly modified from a version at Wikipedia: http://en.wikipedia.org/wiki/Galvanometer.
The quotation from IBM in the Appendix is from http://www.research.ibm.com/research/gmr.html, accessed February 5, 2008. The date stamp of the html file is March 16, 2004.